Preparation
-
-
- Ensure you have multiple heavy-duty battery-powered drills with extra batteries and charging stations to prevent downtime
- The wall logs are pre-cut and numbered; no additional cutting is required
- When your kit arrives, the packages are numbered or lettered in sequence
- It’s best not to open all packages; only open the one you will be working with to keep other materials protected
-
Laying the First Row of Logs
-
-
- The first row consists of full logs in one direction and half logs in the other direction
-

-
-
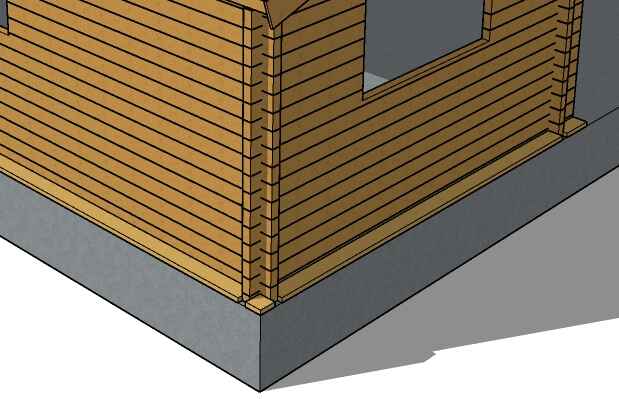
- Lay the first row down on your foundation, whether it’s a concrete slab or a wood floor over a crawlspace or basement (You’re now looking at your floor plan of the building)
- Use a moisture barrier between the first row and the floor. Old asphalt shingles cut into strips can be used, or a special moisture barrier tape can be purchased from a local building supply center
-

-
-
- Measure corner to corner to ensure the first row is square and level. To check the level, use a string

-


-
-
- If the first row is on a concrete slab, it must be anchored using Tapcon screws or cement anchors placed approximately every 39 to 40 inches
-

Stacking the Logs
-
-
- Now you’re ready to start assembling by placing each row down and fastening it to the lower row with 8-inch log screws provided and placed approximately every 39 to 40 inches
-

-
-
- Stagger the screws in each row to prevent alignment issues with screws in lower rows
- Stack interior and exterior walls simultaneously
- Count the rows for window and door openings to avoid over-stacking
- If a wall log is slightly twisted and difficult to set in place, use a 10-inch C-clamp for leverage. This will help twist the log and lower it into position while you put your screws in place. Be sure to prevent damage to the wall log when fastening the C-clamp
-
Gable and Roof Installation
-
-
- When installing the angled gable components, screws should be placed at a 90-degree angle to the slope to improve wind resistance and prevent uplift
- If the purlins are tight, use candle wax on the inside of the pocket and on the outside of the purlin to help it slide into the slot more easily
- The purlins should be connected using screws placed at an angle, as shown in the diagram
- The roof boards are best started from the front of the building and worked towards the back. On the back side, you will need to trim the roof boards to be even with the ends of the purlins
- Use a floorboard tightening tool to keep the tongue-and-groove boards as tight as possible before securing them with screws or nails
- A bead of construction adhesive or sealant can be applied between the top of the walls under the tongue-and-groove roof boards
-


Facia Trim and Roofing
-
-
- When installing the facia trim, use a countersink drill bit and screw the facia trim down, rather than using nails

- Apply roofing paper or light-duty asphalt roofing over the tongue-and-groove boards immediately after installation to prevent moisture damage
- Staple plastic sheeting over the window rough openings to prevent moisture from entering the building while working on the exterior walls. When ready to install windows, simply cut the plastic from the exterior
-


Roof Build-Up
-
-
- When installing the roof build-up, connect the front and sides first before laying down the roof rafters
- The roof build-up component along the facia trim allows you to walk on the roof more safely and prevents slipping, making it easier to install the roof build-up rafters
-

Framing Interior Walls
-
-
- A bottom plate is laid on the foundation and fastened in place before the vertical studs are installed
-
- Install the vertical studs using the provided 8-inch screws, spaced approximately 24 inches apart
- A bottom plate is laid on the foundation and fastened in place before the vertical studs are installed
- Studs are placed with 22.5-inch spacing to accommodate insulation
- The vertical studs can be pieced together as they are not structural, helping to eliminate waste
- If the interior walls or doorway rough openings are not running true, they may zigzag. Fasten a 2×4 block on both the inside and outside of the rough opening to hold it straight until the interior doors are securely fastened in place
-

Window Installation
-
-
- When installing windows on the exterior, center the windows into the rough opening
- Secure the window through the trims at the base, then square it to ensure it properly opens and closes before securing the top
-
